Instagram - everything you need to know for the Raw Umber Live sessions.
Raw Umber uses Instagram and the hashtag #RawUmberLive for the online sessions, which allows you to showcase your work to us and others as well as let you browse other people's drawings.
In this guide, we’ll walk you through everything you need to know on how to post your work on Instagram as well as how to use the Raw Umber Live hashtag.
Don't worry if you don't know what a hashtag is - by the time you follow the steps in this guide you'll understand.
Table of contents
How to set up an Instagram account
Before you can start posting you will have to download the app. Follow these 6 steps to start your own Instagram account.
Step #1: Download Instagram from the App Store.
You will need a smartphone for this. Go to the Play Store if you have an Android phone or the App store if you use Apple. Then search for ‘Instagram’ and finally click ‘Download’.
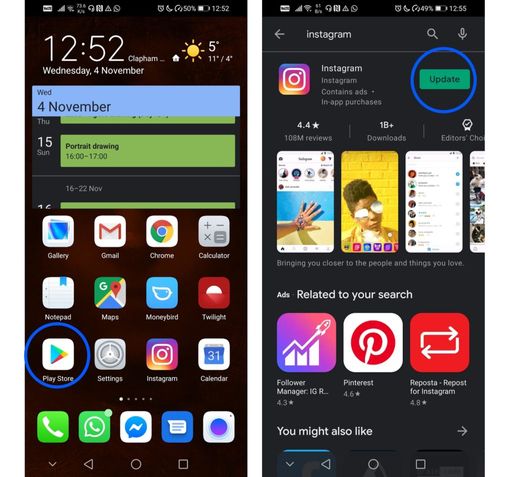
Note that on my phone it says ‘update’ instead of ‘download’, as I already have the app.
Step #2: Setting up an account
Once the app has downloaded, you'll want to create an account. When you launch the app you should see a link at the bottom of the screen that reads: "Don't have an account? Sign Up." Click that to start the process of signing up to Instagram.

You can sign up with Facebook, or sign up using your phone number or email address. You'll then be asked to create a username and password. You can also add your full name and a profile photo if you want to.
How to post a photo of your work
If you've followed all of the steps above, you'll now have created an Instagram account. Congrats! Now, let’s take a photo of your drawing to post on Instagram.
Step #1: Using your phone's camera
Click on the camera icon for your phone to open up your camera. Now you can take a photo of your drawing by clicking the ‘take a photograph button’.
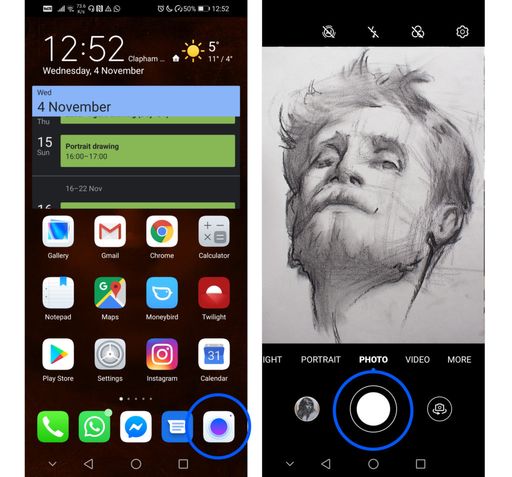
Make sure to aim your camera so the whole drawing is on the screen and not distorted.
Step #2: Open the Instagram app
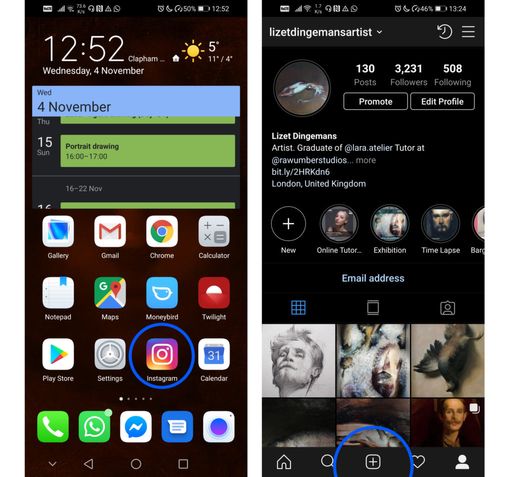
First, open up Instagram by clicking on the icon in your home screen. Then, click the plus button on the bottom.
Step #3: Choose the image or video you’d like to post
You can choose to add a photograph from your camera roll or take a photo or video right in the app. In this case, we have just taken a photo of our work so let's choose that one. Once you’ve chosen it, press “Next” in the top right corner.
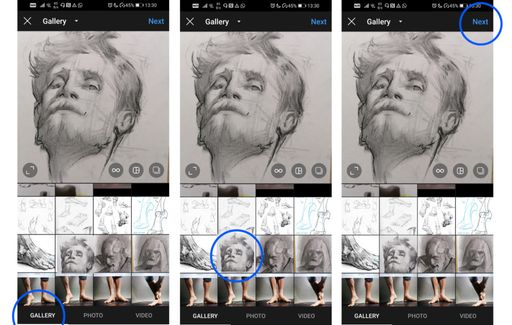
Tip: You can resize an image or video by pinching the screen to fit Instagram dimension requirements.
Step #4: Edit your image
Now you can filter or edit your photo on Instagram — there are a number of built-in Instagram filters and edits to choose from. Feel free to experiment or just click ‘Next’.
Step #5: Create a caption
It’s time to enter your caption, tag people, and add a location to your post. A caption can be anything you would like to say about your drawing, but this is also where you can add hashtags. Try adding #rawumberlive to the caption. When you are happy with the post, click ‘Share’. You have now successfully shared your work!
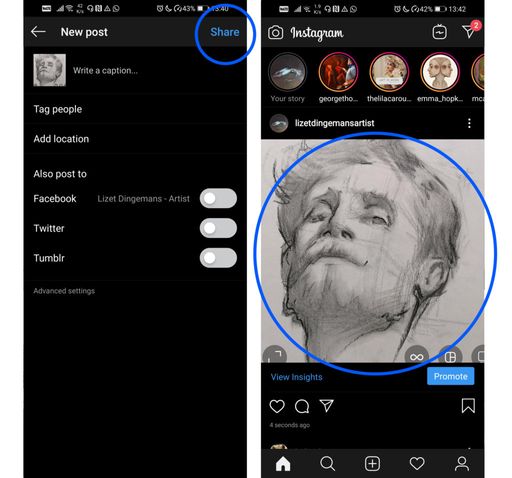
You will now see your picture appear on the Instagram feed.
How to use the #RawUmberLive hashtag
Raw Umber uses the #RawUmberLive hashtag. This is a way to categorize and easily find things on Instagram. For instance #dogs will probably get you dog pictures, and we use #RawUmberLive to see all the work everyone has done with our live sessions.
To search for the #RawUmberLive hashtag, tap the search icon at the bottom of the screen to search. Simply start typing ‘RawUmberLive’ and it should pop up.
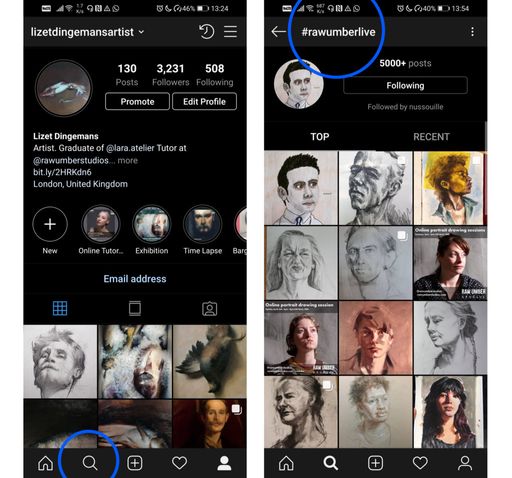
Now you can see everyone's drawings who have use the tag #RawUmberLive, including your own!
